Tuesday, February 25, 2014

FREAK OUT!

Most brides will say that they aren't/weren't really a bridezilla and were pretty mellow about everything wedding related. I, however, can confidently say that I was probably in the top 5% of lease bridezilla-esque brides. At one point, my best friend was having anxiety over my lack of anxiety regarding the event. I had a few moments, I'll admit, but I am relatively proud of how I handled the stress.

Now, there are a few USPS postal workers who would probably disagree with me, but they were just lucky enough to witness my one and only meltdown. 

I am a crafty person. I am a crafty person who has had a Cricut or Cameo for 4+ years. I have made 3 other wedding invitations or programs. OF COURSE, I made my own invitations. Now, before I share my gorgeous wedding creations with you, let me tell you more about my meltdown. 

Josh bought me a Cameo for Valentines Day last year because he knew that I would make our invitations and I needed something that was capable of more intricate cutting than my Cricut. I love it. We worked together to find the paper and approve of the design. I found an invitation that I loved, but I knew that creating the SVG would take me too long and it would never be perfect enough, so I reached out to a designer on Etsy that created the file for me. Check him out sometime if you are stuck and need some help: https://www.etsy.com/people/dominicparker. Anyone who has made homemade invitations knows that it is definitely a process! My design is quite intricate so it took about 12 minutes to cut 2 invitations. Josh had to learn how to load the machine so we could keep the production line going when I wasn't around. 

After many hours of making, stuffing, and addressing the invitations - it was time to mail them. I took them to the post office and had them weigh them. I wouldn't make a rookie mistake like not weighing them. The postal worker provided me with the appropriate stamps that I needed. Once all the envelopes were stamped, I put trusted them to the dozens of postal workers that would now deliver my precious creations to my lovely guests. 

The next day my Dad calls me and says: "Honey, Jaws (an invitee) just went home at lunch and the mailman is trying to collect 46 cents from him for your wedding invitation." Now I start to panic. I left work immediately and went right back to the post office to try and figure it out. Unfortunately, the woman I dealt with the previous day was at lunch and the lady that was there basically had no way to help me. I won't comment on her attitude. Flashes of the hours I spent and the irreplaceable invitations and the hours I would have to spend re-making start playing through my head. After 10 minutes or so in the post office, I lose it. 27 year old woman getting married in 2 months shamelessly crying in the middle of a post office. Not my proudest moment. Finally, my helper from the day before comes in and informs me that her scale wasn't calibrated yesterday and she under weighed my invitations. Her manager's executive opinion was to send them and hope that no one ever questioned them. (Never mind that they could have sent them all to the return address, or sent a post card informing us of the problem, or - novel idea - PUT THE CORRECT AMOUNT OF POSTAGE ON THEM BEFORE SENDING SINCE IT WAS THERE FAULT.) Nothing could be done but wait to hear when people did or didn't receive them. Public tears helped very little. Luckily, almost all of the invitations made it safely. My dignity is mostly still intact. 

Now....for the big reveal:
I used square envelopes from a bulk paper store. I used a portion of the invitation SVG file in a lighter opacity than the lettering purple in the corners of the envelope. I know that etiquette says you should hand address your envelopes, but I made the executive decision that I would put the same amount of time and effort in to each envelope and that they would look much better than my handwriting. 
In each envelope was the gate fold, die-cut invitation as well as an "Additional Information" packet.
Here's the invitation. They light is deceiving, but they are a dark purple card stock paper.
The invitation wording is printed on a light gold leaf metallic paper. I printed the square invitation, the reception card information and the "additional information" band on (1) 8.5" x 11" piece of paper.

I picked a font pairing that I really liked and tried to use the combination on all of the wedding printing.


Here's a good representation of the color. Most of the little cutouts came off when I took the paper off of the Cameo mat, but I did have to use my tweezers to pull some of the stragglers out.
Invitation, Reception information, RSVP card


I love my invitations. I think that they are very "Me" and feel like they weren't cheesy homemade, but very classy. (Shout out to the husband - he was right! I should have called out our wishes for the reception and who specifically was invited. Since I had read so much about how it's not proper to say it's an "adult reception" or telling people that the invitation is only for 2 people, I did not want to call that out. I should have. It would have saved me a bunch of stress. I can't change it, but that is my advice to anyone going through this process.) It's so awesome to see personal touches for weddings. I tried to do that in so many of the things I did, but the invitations are probably one of my greatest creations. Hope you think they are awesome, too!


Always in Bloom

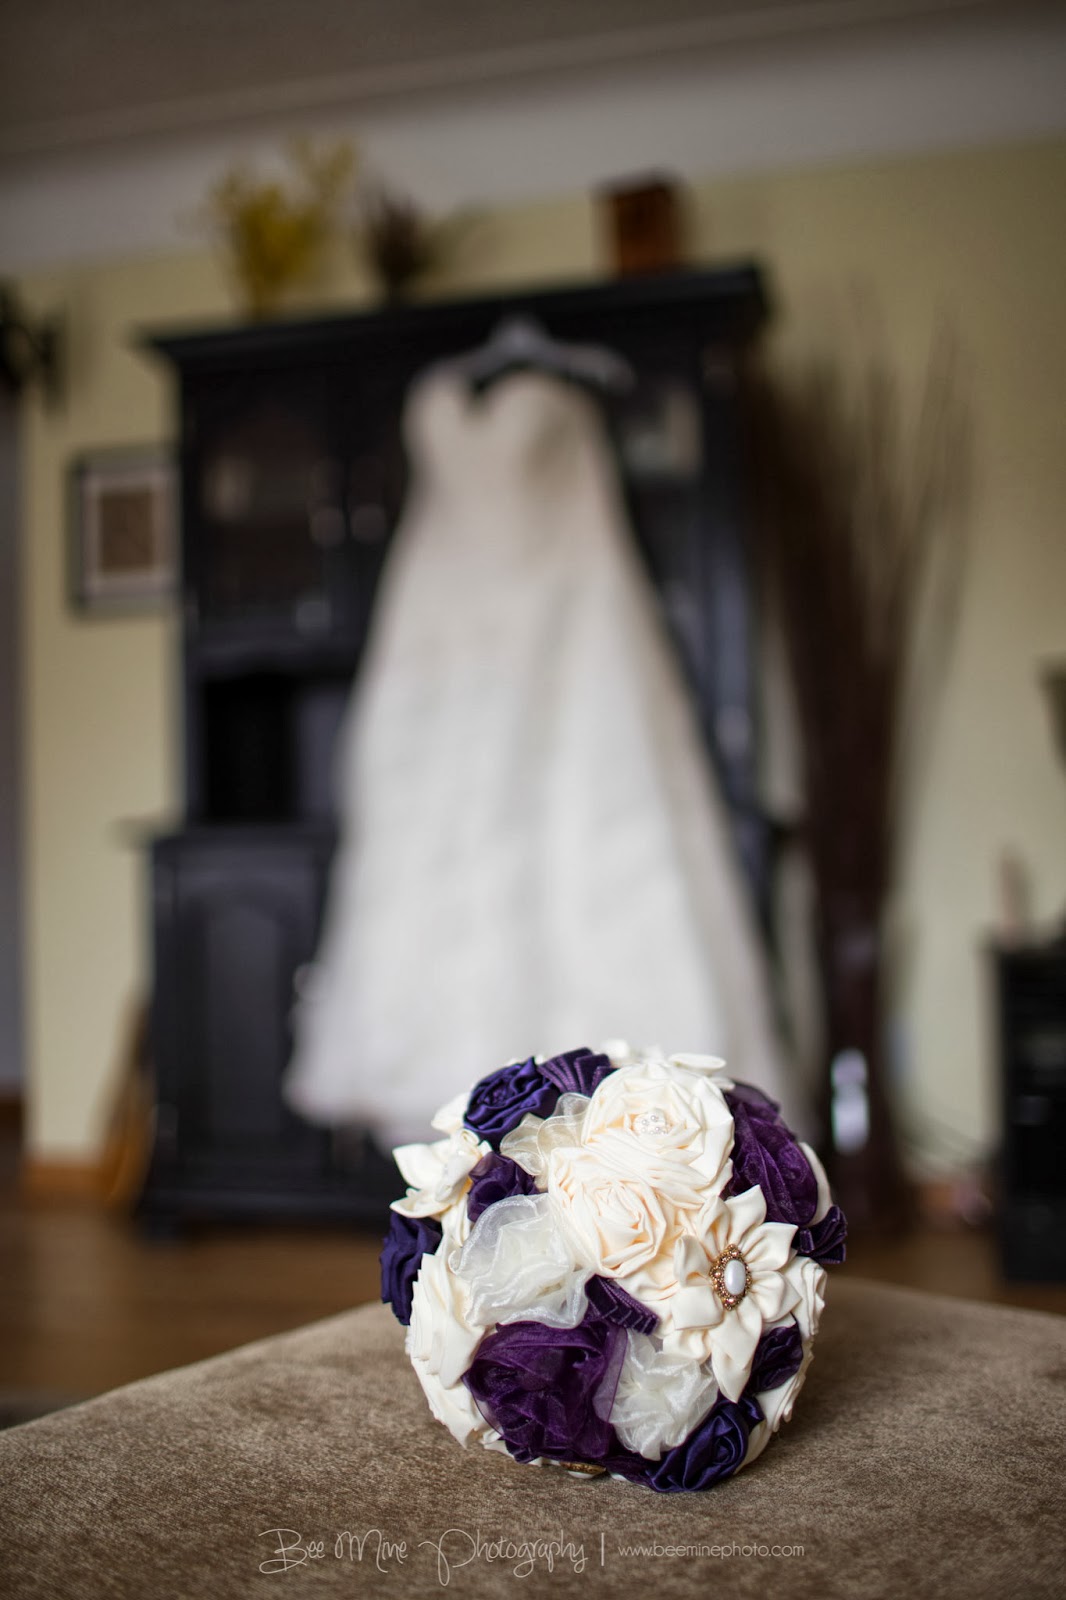
You know what's pretty? Flowers. You know what is awesome? Handmade fabric flowers.

Case in point: 


What you have here is the product of a random idea, that turned in to a few google searches, that then became the center of many hours of flower making. In the end, it came out to be one of the most fabulous things I have ever seen. 

I am a paper girl, mostly. Typically, my craftiness centers around my Cricut or Silhouette Cameo. One day I happened to see a wedding bouquet that was made of paper. It was super cute, but it was very "spring-like" and I think that almost any paper bouquet would have felt the same. Then I had an idea: "I wonder what a fabric bouquet would look like? Enter Google. 

I fell in love with this bouquet and enlisted the fabric master: mom. She fell in love. We started making flowers. And more flowers. Then we started arranging them with pins on a Styrofoam ball. Decided we didn't like a bunch of the flowers we made and set those aside. Made more flowers. I promise you that the result is absolutely worth it, but this project is not for the faint of heart. It is not a fast process, and the glue gun can be vicious! This flower-making session seemed to last forever...


In the end, my bouquet ended up with just ivory and purple. We used some velvet ribbon to make some embellishing flairs. There are a few buttons and garnishments in some of the flowers.


I had seen different versions of stems: a whisk, a solid piece of wood turned on a lathe, etc. I chose wooden dowels which were already green to actually resemble the stems. We covered the plastic bouquet holder in lace and then hot glued the ball to the holder. 

Once we felt comfortable with the mix of flowers we started gluing. My mom has this really awesome old school hot glue gun. Ya know, the ones that actually work and aren't crappy. Unfortunately, that means it gets really hot and isn't nice to the skin, but it works so good! Along with my bouquet we (mostly she) also made my Matron of honors, mother's corsages, all the men's boutineers.


Here's a few shots that our fabulous photographer at Bee Mine Photography took that highlight the flowers. Be sure to check out http://beeminephoto.blogspot.com/


 Fabulous. Gorgeous. Priceless.

Thursday, December 26, 2013

Just Married!

Well...almost! We just passed our one month anniversary as Mr. And Mrs. Root!!

I feel like I am slowly coming back to life. It's been quite crazy even though the stress levels during the planning and wedding were relatively low, I tried to shove a whole lot of action in to a small window of time.  My first niece was born o October 19. She is perfect and spoiled and I love her very much. She has already been the center of many creations in our family and I foresee many more to come. The following week I accepted a new job, put in my 2 week notice and then started a new job on November 4...3 weeks before the wedding. Crazy right? We also purchased our first home in November. Luckily, we had been renting so no moving was necessary.

The wedding came and went so incredibly fast. It was a beautiful event overflowing with friends and family. I have to start walking through some of the delicious details, but as a little teaser I thought I would share our favors. My new last name is Root. A while back I had the idea to have "Mr and Mrs Root Beer." It is one of the only ideas that is entirely authentic and not Pinterest or website inspired, so I am pretty proud of it.  I purchased cases of IBC root beer from Sam's club (24 bottles for about $10). I designed a new label/tag for the bottles. The bottles do not have a label but they have embossed glass so I couldn't use a sticky label. Instead, I printed the label, cut the shape out on my silhouette, and used foam tape to adhere to the glass without crumpling the tag. Here they are. I love them!

Tuesday, September 3, 2013

Not Quinn...Hayley!!

I am so excited to meet my niece! And hopeful that her parents have landed on a name that'll stick. Hayley Quinn seems to be the winner!

The baby shower was just last weekend and my family made some special presents for the little princess-to-be.

When my sister-in-law called me to ask if I would make the favors, I quickly accepted the challenge. The shower was a Miss Molly's Tea House. I had never been, but I quickly decided that something Tea related would be appropriate. I created a tag that read "Sugar and Spice and Everything Nice"to attach to a clear bag. Then, I made some scones! How pretty do they look?!?

I made these ahead of time so that I wasn't scrambling to do it the week of the shower. I cut them and put them in the freezer. A little closer to the shower, I took them out, stuffed the bags and added a bag of tea to them (Twinings English Breakfast Tea, for those Fifty Shades Fans...) Stapled one the tags and...Voila!

My mom was in charge of the cake, but I wanted to make something to take along as well. Cassandra wanted a cassata cake, so I figured I would make this fun cake sans the strawberries, in case someone couldn't have strawberries. Here's the pic: http://pinterest.com/pin/12736811419425408/

Here's the trial run photo:

And here's the shower day cake:

The lines on the trial run are much cuter...but the day before the shower, patience were running low. My biggest piece of advice should you choose to make this is do not skimp on the amount of batter you put on your design/chevrons. The batter doesn't really run anywhere,  but if it's not substantial enough the design easily peels apart from the rest of the cake. Super cute and impresses the crowds for sure!!

Another baby shower funsie - was the guest book onesie! The original pin was a little bit different. I was pressed for time, so I just used some stencils and fabric paint to put the word "loved" on the onesie. At the shower, guests signed it with a Sharpie. Pointer: instruct your guests to hold the fabric taught and sign lightly. Perhaps a finer tip would have been better as well. Some guests had a hard time signing and being able to read it after. the plan is to take her picture wearing it and then maybe frame it to hang in the nursery.


For one of her gifts from Auntie Annie, I made a wall decal with a quote that her mama had picked out. Using my Silhouette Cameo and some white adhesive vinyl, I cut the quote out. We hung it out her nursery wall yesterday. The upside to doing Wall Decals yourself is that I didn't have to pay much to do it. The downside, I didn't have any type of transfer paper, so I had to put each individual piece on by itself. And then when the men came in to taunt me about how straight it was or wasn't, I just had to settle with the fact that imperfect is perfect, right?!? After the quote was on the wall, we used some of the flowers to add some flair!


I wanted to make a name piece to hang in the Nursery, but I didn't want to do individual letters, mostly because hanging them straight is a pain! So, instead I bought a 36" x 12" Poster frame and had the future husband spray paint it white. Using my Cameo again, I cut out "HAYLEY" from white poster board. I had extra fabric pieces left over from the bedding my mom made her and intended to put them behind the white poster board. Unfortunately, the white wasn't enough contrast with the fabrics. So, back the Cameo I went. I cut the letters out of a melon colored paper. MUCH better. With the white frame, pink letters, and starched and ironed fabric it's just about perfect. (I'll save you the details that I think aren't perfect!)


The last thing to share, was not from my hands. It was, however, my mother's work. Cassandra picked the fabric and my mother designed and created the bedding. How precious!!


Oh! And how could I forget these ADORABLE handmade dresses from Grandma!

As you can tell, we are all very excited for the first little grandchild/niece in our family. It's been a fun adventure so far making fun things and getting ready for her arrival. Now, we just have to wait! and finish planning a wedding. No big deal!


Friday, May 24, 2013

Quinn!

I am going to be an AUNTIE!!! A real one this time :) I have some VERY special little people in my life that fascinate me in ways that I never thought possible, but this time I will earn the official title of Aunt!

My brother and sister-in-law are having a baby, which I have known for what seems like forever now because they knew so early. However, this week the best birthday present I could get was finding out that I am going to have a little niece to love on! She is due in October, so she will be about 4 or 5 weeks old at my wedding. I can't wait to take a picture with her and she'll be the only niece or nephew that got to go to Auntie Annie's wedding. TOTALLY pinterestable moment there, right?!?

So, when I found out that it was a girl on Tuesday I immediately went shopping and surfing the web for a little dress for her to wear in that picture. Then I headed right home to make her first headband. It's nothing fancy, but it will match my wedding flowers. I don't have a little baby to model it on, but I wanted to share it since it is such a happy thing for me. Here's to 5 months until I meet Quinn and 6 months until the wedding!! (That last part is a little scary, but it'll be great!)


Thanks for reading! Have a happy Memorial Day!!! 


Monday, March 4, 2013

Whip it good!

If you read this blog at all, you are probably tired of my frames with changing graphics...but I have another one. I'm sorry, my fiancée and I don't really have too many photos of people to show off in our house, so we show off my crafts.

For Valentine's day he got me a new Silhouette Cameo. I am replacing my Cricut and preparing for wedding creations that will soon need to get underway (and by soon I mean I need to pick a date and venue and final theme - so soon after that all happens). My first project was new cut outs for my frames. They are SVGs that I would share by request and I just think they're fun. Here they are....enjoy!


Whip it good!
*Andrea*

Please don't take my Sunshine away!

I TRY not to complain about the weather too much. Sometimes I feel like I get caught in a hamster wheel of complaints like that - as soon as the weather changes it's "too" something. But I love Sunshine. In Northeast Ohio, it is very easy to have a winter full of gray days that leave you wishing for My. Sun to come out and play. We have been fortunate this year that the gray hasn't been so bad. On day of sunshine inspired me to make this new craft!

Currently, I am digging the chevron fad, but my house (what is decorated of it) isn't really hip enough for that. So, I decided I would decorate the hallway with a pop of sunshine, color and pattern.

I used some canvases that I had bought for a project this Christmas. I painted them both light yellow. To make the Chevron, I cut some vinyl on my Cricut and spaced it out and stuck it down then painted the darker yellow. When it was all dry I made the flower out of felt. It was the first time I have done something like that, so it's not the best, but I cut the petals and hot glued them to the canvas. Pretty good for a first try. With the larger You are my sunshine canvas I used masking tape to make the different stripe sizes before painting the bright yellow. I free handed the wording. If I did it again, I would probably use a stencil of some sort.


I'm really diggin' it and love that it's just a POP of sun in a darker spot of the house. I am thinking about trying the "Fake Canvas Photo" Technique on some smaller 4x6 or 5x7 pictures to put around/rearrange with these fun additions. Here's the pin that inspired me to try the fake canvas project: http://pinterest.com/pin/427701295831889724/

What have you done lately to put a little sunshine in your life?

*Andrea*